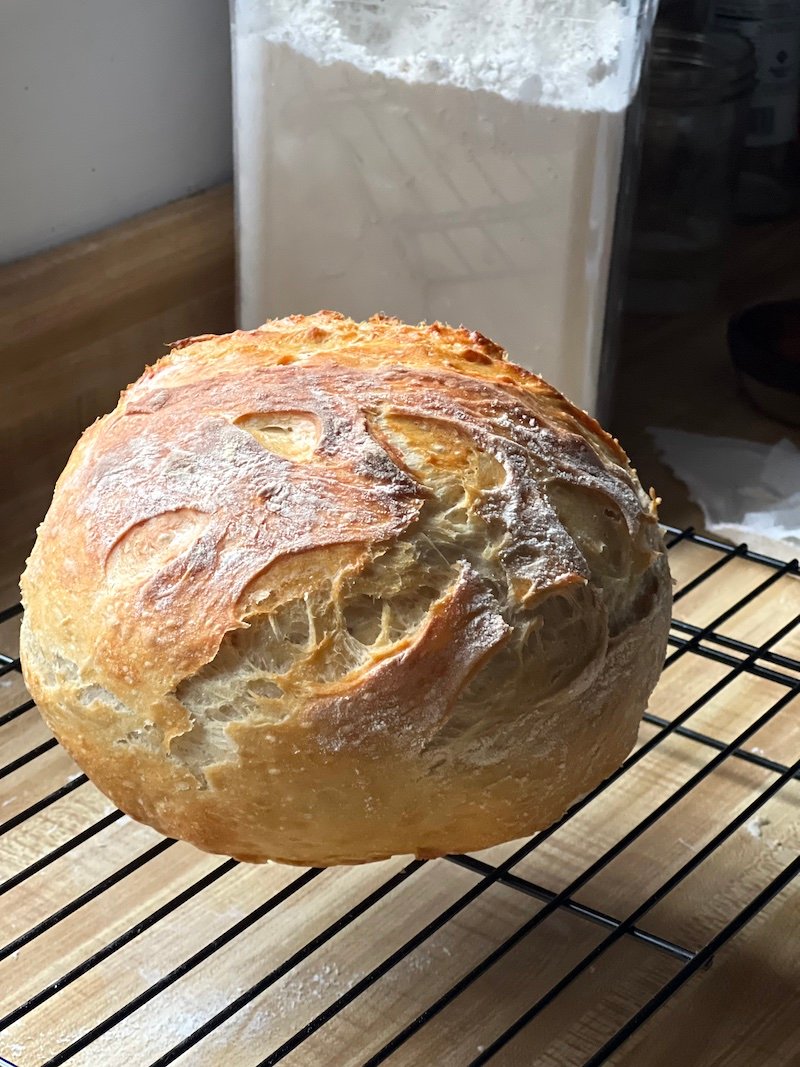
Cheater Sourdough Bread
This cheater sourdough bread recipe may make the fear of using yeast a thing of the past. My method also does not require any special equipment other than a bowl and a Dutch oven.
In a world where instant gratification often reigns supreme, the art of making sourdough bread stands out as a testament to the power of patience and practice. Much like mastering any skill, learning to create the perfect loaf of sourdough takes time, dedication, and a willingness to embrace the learning process. In many ways, the journey of mastering sourdough mirrors the challenges we face when striving for weight loss or any other significant goal in life.
At first glance, the process of making sourdough bread can seem daunting. It involves cultivating and maintaining a sourdough starter, understanding the intricacies of fermentation, and learning how to handle and shape the dough. For those new to the world of sourdough, it’s easy to feel intimidated and uncertain about where to begin. Similarly, embarking on a weight loss journey can feel overwhelming, with countless diets, exercise plans, and conflicting advice bombarding us at every turn.
The key to success in both endeavors lies in persistence and a willingness to learn from mistakes. Just as a baker learns to recognize the subtle signs that indicate the readiness of sourdough dough – the elasticity, the bubbles, the aroma – so too must someone on a weight loss journey learn to listen to their body and adapt their approach based on feedback.
One of the most crucial lessons that sourdough baking teaches us is the value of patience. Unlike commercial yeast, which can produce bread in a matter of hours, sourdough requires a slower, more deliberate approach. The starter must be fed and nurtured over several days, allowing the wild yeast and bacteria to develop and impart their unique flavors to the dough. Similarly, sustainable weight loss requires a long-term commitment and a willingness to make gradual, sustainable changes to one’s lifestyle.
Moreover, the process of making sourdough bread is inherently tactile. As bakers work the dough, they develop an intuitive understanding of its texture, hydration level, and readiness for baking. This hands-on experience cannot be rushed or replicated by following a set of rigid instructions. Likewise, achieving lasting weight loss often involves tuning into one’s body and developing a deeper awareness of hunger cues, emotional triggers, and habits that may contribute to overeating.
Perhaps the most important parallel between sourdough baking and weight loss is the notion of embracing failure as a stepping stone to success. Every baker has experienced their fair share of flat loaves, dense crumb, or overproofed dough. Yet, it is through these failures that we learn and grow. Similarly, setbacks and plateaus are inevitable on the path to weight loss. Instead of viewing them as reasons to give up, we can choose to see them as opportunities to reassess our approach, learn from our mistakes, and continue moving forward.
How to make a sourdough starter.
I’ve watched hours upon hours of YouTube videos to get a better understanding of the world of sourdough. The sourdough starter that I used was from The Clever Carrot. However, I’ve only used unbleached all purpose flour for both my starter and dough recipes. I keep a cold house, so I bought this seed mat to wrap around my sourdough starter to keep it at the perfect temperature.
Tools Needed to Make Sourdough Bread
While you could spend a lot of money on special tools, you really only need a razor blade to score your dough, a bowl to mix the dough and a Dutch oven. I have one dutch oven that I only use for baking bread. You can find inexpensive ones at Walmart for about $47.

Cheater Sourdough Bread
The sourdough recipe I use is from Sourdough Enzo. Please check out her YouTube for more detailed instructions.
Ingredients
- 720 grams of water
- 100 grams of sourdough starter
- 1 teaspoon active yeast
- 20 grams salt
- 1000 grams unbleached all purpose flour
Instructions
- These instructions kind of simplify the sourdough steps. While it seems like a lot, it's really only about 10-15 minutes hands on time.
- Mix the above ingredients together and let sit for 30 minutes. Cover with plastic wrap or a clean dish towel.
- Stretch and fold the dough four times around the bowl. Rest for 30 minutes. (click link to see video)
- Stretch and fold the dough four times around the bowl. Rest for 30 minutes.
- Stretch and fold the dough four times around the bowl. Rest for 30 minutes.
- Stretch and fold the dough four times around the bowl. Rest for 30 minutes.
- Let dough double in size. This could take 2-3 hours.
- Once dough has doubled in size, leave on the counter overnight.
- The next day, divide dough into two loaves. Stretch one dough out into a rectangle, fold the sides in, then roll up into a ball.
- Roll the dough on your counter to seal the bottom.
- Place each loaf in a bowl, cover and let refrigerate for five hours.
- Preheat oven to 475. Place the dutch oven in the oven and preheat for one hour.
- Place dough on parchment paper. Score with a razor as desired.
- Carefully remove the dutch oven, take the lid off, place the dough into the dutch oven and cover. Bake for 20 minutes.
- Remove lid and bake an additional 20 minutes.
- Cool completely before slicing.
Notes
The number one question I get asked is "how many points?!" Well, it depends on how big a slice you have. I simply cut my slice of bread, weigh it and add it to my tracker. My piece is usually about 4 points.
Nutrition Information:
Yield: 24 Serving Size: 1Amount Per Serving: Calories: 160Total Fat: 0gSaturated Fat: 0gTrans Fat: 0gUnsaturated Fat: 0gCholesterol: 0mgSodium: 325mgCarbohydrates: 33gFiber: 1gSugar: 0gProtein: 5g


Can’t wait to try this method! The link to the seed mat goes to Clever Carrot. Can you fix that?